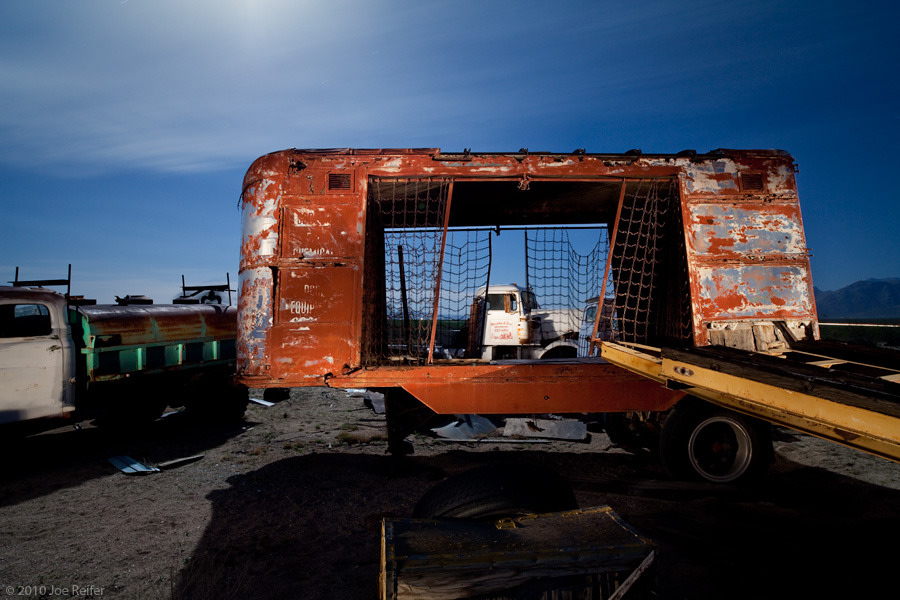
Night photography: Step-by-step through a complex light painting setup
Technical details: 4 minutes at f/9.5, ISO 200. Canon 5D Mark II with a Zeiss Distagon 21mm f/2.8 ZE lens
The composition above was used as a light painting demonstration during last month's night photography workshop. All the light you see on the foreground subjects was added with a flashlight while the shutter was open. Due to the number of different surfaces being lit, this setup took multiple attempts to get right. Let's take a brief walk through the steps involved:
1. Daytime Scouting -- blocking out your shots in the daytime will help you be more productive at night. Photographer Hunter Luisi surveys the scene before the sun goes down.
2. Test Exposure -- checking focus, composition, and exposure before committing to a complicated shot will help you get more keepers. The test exposure was 8 seconds at f/8, ISO 6400. This equates to 8 minutes at f/8 ISO 100 -- or 4 minutes at f/8 ISO 200. In the final exposure, I stopped the lens down to f/9.5 for depth of field, and also to underexpose the background by 1/2 stop in order to give the light painting more snap.
3. Base Exposure -- I was shooting into the moon, which is just out of the frame at top left. Make sure to use a lens hood for night photography. The base exposure was not light painted at all, and underexposed by 1 full stop in order to have a version with a darker sky. A base exposure is useful for seeing the effect of your light painting, and for removing any unwanted lighting in post production. 2 minute exposure at f/8, ISO 200.
4. Light painting -- I lit the red trailer from camera left, walked around and lit the white truck, and then lit the red trailer from camera right. The lighting on the trailer is a bit too bright. By reviewing the feedback on the camera's LCD, I decided to also light the truck on the left, the yellow ramp on the right, and to skim a little bit of light across the box in the foreground.
5. Light painting -- the trailer is just about right, and the side of the yellow ramp is getting there. I missed the back of the truck at left, and decided to light the top of the box in front more than the side directly facing the camera.
6. Light painting -- Finally got a take I liked!
- The truck on the left was lit at an oblique angle from camera left to bring out the shapes along the green part in the back.
- The red trailer was lit on both sides from a 45 degree angle to bring out texture and prevent hot spots
- The yellow ramp was lit from camera left using a snoot to control the lighting, and also on the top from camera right.
- The light skimming across the box in the foreground was also done with a snooted flashlight from camera left.
- The white truck in the background was lit while hiding behind the red trailer
Technical note: a Streamlight Stinger flashlight was used, utilizing a 1.5 foot long cardboard tube as a snoot for lighting control. The Stinger is a high powered flashlight that is great for light painting dark surfaces from middle distances.
Post-Processing notes: While the light painting on the version above worked really well, there was a slight bit of lens flare. The darker, more simple sky from the base exposure looked better -- so I replaced the sky from the earlier exposure using a layer mask in Photoshop. I will cover sky replacement in a future article.
A small amount of dodging and burning were also done on the foreground and right side of the red trailer to create the final image at the top of this post. I hope this extended look at the making of a complex light painted image is useful. Let me know if you'd like to get on the list for future night photography workshops -- all that's necessary is a camera, tripod, flashlight, and your imagination!


